Network retstart
# service netif restart
Routing restart
# service routing restart


Network retstart
# service netif restart
Routing restart
# service routing restart
–ú–ĺ–Ĺ—ā–ł—Ä—É–Ķ–ľ / –ł –Ņ–ĺ–ī–ļ–Ľ—é—á–į–Ķ–ľ /usr
# mountroot> ufs:/dev/ada0p2
# mount /dev/ada0p5 /usr
# mount -u /
# ee /etc/fstab
# reboot
# fsck -y /dev/ada0p1
# mount /dev/ada0p1 /usr
# vi /etc/fstab (change ada0 to ada1)
# reboot
how-to-google-federation-customers
–í –Ņ—Ä–ĺ–ī–ĺ–Ľ–∂–Ķ–Ĺ–ł–Ķ —ā–Ķ–ľ—č.
–ú–Ķ–Ĺ—Ź–Ķ–ľ –Ī–į—ā–į—Ä–Ķ–ł –ł –Ņ–ĺ–ī–ļ–Ľ—é—á–į–Ķ–ľ —á–Ķ—Ä–Ķ–∑ —Ä–ĺ–ī–Ĺ–ĺ–Ļ APC COM-–ļ–į–Ī–Ķ–Ľ—Ć –Ņ–Ķ—Ä–Ķ—Ö–ĺ–ī–Ĺ–ł–ļ–ĺ–ľ COM to USB –ļ PC.
–°–ļ–į—á–ł–≤–į–Ķ–ľ ApcFix –ł –∑–į–Ņ—É—Ā–ļ–į–Ķ–ľ, –≤—č—Ā—ā–į–≤–Ľ—Ź–Ķ–ľ –≥–į–Ľ–ĺ—á–ļ—É SMART-UPS AUTO Fix
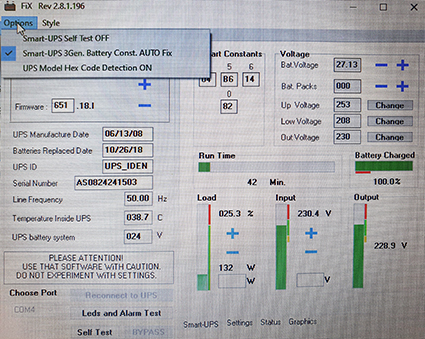
–Ē–ĺ–∂–ł–ī–į–Ķ–ľ—Ā—Ź –ļ–ĺ–≥–ī–į –Ņ–į—Ä–į–ľ–Ķ—ā—Ä “0” —É—Ā—ā–į–ļ–į–Ĺ–ł—ā—Ā—Ź
–ó–į–ļ—Ä—č–≤–į–Ķ–ľ –Ņ—Ä–ĺ–≥—Ä–į–ľ–ľ—É.
–°–ļ–į—á–ł–≤–į–Ķ–ľ Power Chut Bisnes Edition v9.5.0/9.5.1, –∑–į–Ņ—É—Ā–ļ–į–Ķ–ľ, –Ĺ–Ķ –∑–į–Ī—č–≤ –∑–į–Ņ–ł—Ā–į—ā—Ć Login –ł Password –ł –∑–į—Ö–ĺ–ī–ł–ľ —á–Ķ—Ä–Ķ–∑ –Ī—Ä–į—É–∑–Ķ—Ä:
https://localhost:6547/logon
–ó–į–Ņ—É—Ā–ļ–į–Ķ–ľ –ļ–į–Ľ–ł–Ī—Ä–ĺ–≤–ļ—É. –Ė–Ķ–Ľ–į—ā–Ķ–Ľ—Ć–Ĺ–ĺ, —á—ā–ĺ –Ī—č –Ī–į—ā–į—Ä–Ķ–ł –Ņ—Ä–ĺ—Ā—ā–ĺ—Ź–Ľ–ł –Ĺ–į –∑–į—Ä—Ź–ī–ļ–Ķ 12 —á–į—Ā–ĺ–≤.
–í —ć—ā–ĺ–Ļ –∂–Ķ –Ņ—Ä–ĺ–≥—Ä–į–ľ–ľ–Ķ –ľ–ĺ–∂–Ĺ–ĺ –ł–∑–ľ–Ķ–Ĺ–ł—ā—Ć –ī–į—ā—É —É—Ā—ā–į–Ĺ–ĺ–≤–ļ–ł –Ī–į—ā–į—Ä–Ķ–Ļ. –ē—Ā–Ľ–ł —É –≤–į—Ā –Ĺ–Ķ—Ā–ļ–ĺ–Ľ—Ć–ļ–ĺ –Ī–Ķ—Ā–Ņ–Ķ—Ä–Ķ–Ī–ĺ–Ļ–Ĺ–ł–ļ–ĺ–≤, —ā–ĺ —É—Ā—ā–į–Ĺ–ĺ–≤–ļ–į –Ņ—Ä–ĺ–≥—Ä–į–ľ–ľ—č –Ņ–ĺ–Ĺ–į–ī–ĺ–Ī–ł—ā—Ā—Ź –ļ–į–∂–ī—č–Ļ —Ä–į–∑.
–£—ā—Ä–ĺ –Ĺ–į—á–į–Ľ–ĺ—Ā—Ć –Ĺ–Ķ —Ā –ļ–ĺ—Ą–Ķ. –ü—Ä–ĺ—Ā–ľ–į—ā—Ä–ł–≤–į—Ź –Ľ–ĺ–≥–ł, –ĺ–Ī–Ĺ–į—Ä—É–∂–ł–Ľ, —á—ā–ĺ –Ĺ–į web —Ā–Ķ—Ä–≤–Ķ—Ä–Ķ –į–Ĺ–ĺ–ľ–į–Ľ—Ć–Ĺ–į—Ź –Ĺ–į–≥—Ä—É–∑–ļ–į. –ü—Ä–ł—á–Ķ–ľ, ping –Ķ—Č–Ķ —ą–Ķ–Ľ, –į –Ņ–ĺ ssh —Ź —É–∂–Ķ –Ĺ–Ķ –ľ–ĺ–≥ –ī–ĺ—Ā—ā—É—á–į—ā—Ć—Ā—Ź. –°–ĺ–ĺ—ā–≤–Ķ—ā—Ā—ā–≤–Ķ–Ĺ–Ĺ–ĺ –≤—Ā–Ķ —Ā–į–Ļ—ā—č –Ľ–Ķ–∂–į–Ľ–ł. –ė–ī–Ķ–ľ –Ĺ–į —ą–Ľ—é–∑ –ł —Ā–ľ–ĺ—ā—Ä–ł–ľ –ļ—ā–ĺ –ľ–Ķ—ą–į–Ķ—ā.
# tcpdump -i bge0 host 19x.xxx.xxx.xx4

....
10:58:29.348293 IP site.com.ua.49864 > 130.0.237.242.https: Flags [S], seq 142297589, win 29200, options [mss 1460,sackOK,TS val 95348608 ecr 0,nop,wscale 7], length 0
10:58:29.348303 IP site.com.ua.49888 > 130.0.237.242.https: Flags [S], seq 3563334456, win 29200, options [mss 1460,sackOK,TS val 95348608 ecr 0,nop,wscale 7], length 0
10:58:29.348313 IP site.com.ua.49880 > 130.0.237.242.https: Flags [S], seq 1828917869, win 29200, options [mss 1460,sackOK,TS val 95348608 ecr 0,nop,wscale 7], length 0
10:58:29.348324 IP site.com.ua.49878 > 130.0.237.242.https: Flags [S], seq 1635255414, win 29200, options [mss 1460,sackOK,TS val 95348608 ecr 0,nop,wscale 7], length 0
10:58:29.348333 IP site.com.ua.49876 > 130.0.237.242.https: Flags [S], seq 3432924249, win 29200, options [mss 1460,sackOK,TS val 95348608 ecr 0,nop,wscale 7], length 0
....
–ó–ī–Ķ—Ā—Ć –≤—Ā–Ķ –Ņ–ĺ–Ĺ—Ź—ā–Ĺ–ĺ. –Ď–Ľ–ĺ–ļ–ł—Ä—É–Ķ–ľ IP, —Ā—Ä–į–∑—É –Ņ–į–ī–į–Ķ—ā –Ĺ–į–≥—Ä—É–∑–ļ–į, –ł –ł–ī–Ķ–ľ –Ņ–ĺ–ī–ļ—Ä—É—á–ł–≤–į—ā—Ć WEB —Ā–Ķ—Ä–≤–Ķ—Ä.
–ó–ī–Ķ—Ā—Ć —Ā—ā–ĺ–ł—ā nginx. –†–Ķ–ī–į–ļ—ā–ł—Ä—É–Ķ–ľ –ļ–ĺ–Ĺ—Ą–ł–≥. –í —Ā–Ķ–ļ—Ü–ł–ł http {…} –≤—Ā—ā–į–≤–Ľ—Ź–Ķ–ľ —Ā—ā—Ä–ĺ–ļ—É:
limit_req_zone $binary_remote_addr zone=one:10m rate=1r/s;
10m is size of zone. 1MB can hold 16000 states. I think this means 16000 unique IP addresses. In case you have way too many sites or very high traffic sites, you may want to increase it to 20MB or 100MB.
1r/s means 1 request per second is allowed. You cannot specify fractions. If you want to slowdown further, means less requests per second try 30r/m which means 30 requests per min, effectively 1 request per 2 second.
location ~ \.php$ {
            limit_req   zone=one  burst=1 nodelay;
}
You can limit the number of connections that can be opened by a single client IP address,
Here we tweak the limit_conn_zone and limit_conn directives to limit the number of connections per IP address.
limit_conn_zone $binary_remote_addr zone=two:1m;

server {
    location / {
        limit_conn two 10;
    }
}
Slow connections can represent an attempt to keep connections open for a long time. As a result, the server can’t accept new connections.
server {
    client_body_timeout 5s;
    client_header_timeout 5s;
}
–Ę–Ķ–Ņ–Ķ—Ä—Ć –Ņ–ĺ–ī–Ņ—Ä–į–≤–ł–ľ iptables, –ī–ĺ–Ī–į–≤–ł–≤ –≤–≤–Ķ—Ä—Ö –Ņ—Ä–į–≤–ł–Ľ–į:
### DDOS PROTECTION ###
### 1: Limit connections per source IP ###
/sbin/iptables -A INPUT -p tcp -m connlimit --connlimit-above 111 -j REJECT --reject-with tcp-reset

### 2: Limit RST packets ###
/sbin/iptables -A INPUT -p tcp --tcp-flags RST RST -m limit --limit 2/s --limit-burst 2 -j ACCEPT
/sbin/iptables -A INPUT -p tcp --tcp-flags RST RST -j DROP

### 3: Limit new TCP connections per second per source IP ###
/sbin/iptables -A INPUT -p tcp -m conntrack --ctstate NEW -m limit --limit 60/s --limit-burst 20 -j ACCEPT
/sbin/iptables -A INPUT -p tcp -m conntrack --ctstate NEW -j DROP
https://gist.github.com/mattia-beta/bd5b1c68e3d51db933181d8a3dc0ba64
https://inmediatum.com/en/blog/engineering/ddos-attacks-prevention-nginx/
https://cryptoworld.su/ddos-ataka-kak-ee-ustroit-i-zashhita-ot-nee/
https://mozgovoy.in.ua/centos-7/103-nastrojka-yadra-linux-dlya-tyazhelykh-proektov-i-zashchity-ot-ddos
–í –Ņ—Ä–ĺ–ī–ĺ–Ľ–∂–Ķ–Ĺ–ł–Ķ —ā–Ķ–ľ—č. –Ě—É–∂–Ĺ–ĺ –Ĺ–į—Ā—ā—Ä–ĺ–ł—ā—Ć –Ņ–ĺ—á—ā—É –ī–Ľ—Ź —Ā–į–Ļ—ā–į —ā–ĺ–Ľ—Ć–ļ–ĺ –Ĺ–į –ĺ—ā–Ņ—Ä–į–≤–ļ—É.
–£—Ā—ā–į–Ĺ–į–≤–Ľ–ł–≤–į–Ķ–ľ
# yum install certbot
# yum install cyrus-sasl-plain
# service postfix restart
–ü–ĺ—Ä—ā 25 –∑–į–Ī–Ľ–ĺ–ļ–ł—Ä–ĺ–≤–į–Ĺ —Ö–ĺ—Ā—ā–Ķ—Ä–ĺ–ľ, –Ņ–ĺ—ć—ā–ĺ–ľ—É –Ĺ–į—Ā—ā—Ä–ĺ–ł–ľ –Ĺ–į 587.
# mkdir /etc/postfix/sasl

# cat sasl_passwd
[smtp.gmail.com]:587 user_gmail@gmail.com:__PASSWORD__

# postmap /etc/postfix/sasl/sasl_passwd
# chmod 600 sasl_passwd
–†–Ķ–ī–į–ļ—ā–ł—Ä—É–Ķ–ľ main.cf
myhostname = aws.tst-amo.net.ua
inet_protocols = ipv4
mydestination = $myhostname, localhost.$mydomain, localhost
mynetworks = 127.0.0.0/8

relayhost = [smtp.gmail.com]:587

# Enables SASL authentication for postfix
smtp_sasl_auth_enable = yes
# Disallow methods that allow anonymous authentication smtp_sasl_security_options = noanonymous
# Location of sasl_passwd we saved
smtp_sasl_password_maps = hash:/etc/postfix/sasl/sasl_passwd
# Enable STARTTLS encryption for SMTP
smtp_tls_security_level = encrypt
# Location of CA certificates for TLS
smtp_tls_CAfile = /etc/ssl/certs/ca-bundle.crt
smtp_sasl_security_options = noanonymous

# TLS parameters
smtpd_tls_cert_file=/etc/letsencrypt/live/aws.tst-amo.net.ua/fullchain.pem
smtpd_tls_key_file=/etc/letsencrypt/live/aws.tst-amo.net.ua/privkey.pem
smtp_use_tls=yes
smtpd_tls_session_cache_database = btree:${data_directory}/smtpd_scache
smtp_tls_session_cache_database = btree:${data_directory}/smtp_scache
–í master.cf —Ä–į—Ā–ļ–ĺ–ľ–Ķ–Ĺ—ā–ł—Ä–ĺ–≤–į—ā—Ć —Ā—ā—Ä–ĺ–ļ—É (–≤–ļ–Ľ—é—á–į–Ķ–ľ 587 –Ņ–ĺ—Ä—ā)
submission inet n - n - - smtpd
–ü—Ä–ĺ–≤–Ķ—Ä—Ź–Ķ–ľ
# echo "Test Postfix Gmail https://example.com" | mail -s "Postfix Gmail" to_user@domen.com
https://medium.com/yavar/send-mail-using-postfix-server-bbb08331d39d
https://www.digitalocean.com/community/tutorials/how-to-install-and-configure-postfix-as-a-send-only-smtp-server-on-ubuntu-22-04
–ü–ĺ—Ā–Ľ–Ķ —É—Ā—ā–į–Ĺ–ĺ–≤–ļ–ł –Ĺ–į AWS LAMP (Centos 7, apache24, php7.4, mariadb10) –≤—č—Ź—Ā–Ĺ–ł–Ľ–ĺ—Ā—Ć, —á—ā–ĺ –Ĺ–Ķ–ļ–ĺ—ā–ĺ—Ä—č–Ķ —Ā–ļ—Ä–ł–Ņ—ā—č –Ĺ–Ķ–ļ–ĺ—Ä–Ķ–ļ—ā–Ĺ–ĺ –ĺ—ā—Ä–į–Ī–į—ā—č–≤–į—é—ā. –ü–ĺ—ć—ā–ĺ–ľ—É –Ĺ—É–∂–Ĺ–ĺ –Ņ–ĺ–Ĺ–ł–∑–ł—ā—Ć –≤–Ķ—Ä—Ā–ł—é php.
–°–ľ–ĺ—ā—Ä–ł–ľ –≤—Ā–Ķ —É—Ā—ā–į–Ĺ–ĺ–≤–Ľ–Ķ–Ĺ–Ĺ—č–Ķ –Ņ–į–ļ–Ķ—ā—č:
# rpm -qa | grep php
php74-php-pecl-mysql-1.0.0-0.23.20190415.d7643af.el7.remi.x86_64
php-cli-7.4.33-6.el7.remi.x86_64
php-mysqlnd-7.4.33-6.el7.remi.x86_64
php-mbstring-7.4.33-6.el7.remi.x86_64
php74-php-common-7.4.33-6.el7.remi.x86_64
gd3php-2.3.3-7.el7.remi.x86_64
php74-php-pecl-mcrypt-1.0.6-1.el7.remi.x86_64
php-json-7.4.33-6.el7.remi.x86_64
php-7.4.33-6.el7.remi.x86_64
php74-php-json-7.4.33-6.el7.remi.x86_64
php74-php-cli-7.4.33-6.el7.remi.x86_64
php74-php-pdo-7.4.33-6.el7.remi.x86_64
php-pdo-7.4.33-6.el7.remi.x86_64
oniguruma5php-6.9.8-1.el7.remi.x86_64
php74-php-gd-7.4.33-6.el7.remi.x86_64
php-common-7.4.33-6.el7.remi.x86_64
php-sodium-7.4.33-6.el7.remi.x86_64
php74-runtime-7.4-3.el7.remi.x86_64
php74-7.4-3.el7.remi.x86_64
php74-php-mysqlnd-7.4.33-6.el7.remi.x86_64
–£–ī–į–Ľ—Ź–Ķ–ľ PHP 7.4 packages –≤–ľ–Ķ—Ā—ā–Ķ —Ā –∑–į–≤–ł—Ā–ł–ľ–ĺ—Ā—ā—Ź–ľ–ł:
# yum remove php-*
–£—Ā—ā–į–Ĺ–į–≤–Ľ–ł–≤–į–Ķ–ľ PHP 7.2 packages:
# yum-config-manager --disable remi-php74
# yum-config-manager --enable remi-php72
# yum install php php-common php-cli php-mysqlnd php-mbstring php-pecl-mcrypt php-json php-pdo php-gd
–ē—Č–Ķ –Ĺ—É–∂–Ĺ–ĺ –Ņ–Ķ—Ä–Ķ—É—Ā—ā–į–Ĺ–ĺ–≤–ł—ā—Ć –ľ–ĺ–ī—É–Ľ–ł apache24 –ł phpmyadmin ???
# timedatectl list-timezones
# timedatectl set-timezone Europe/Kyiv
# yum install update
# yum -y install https://dl.fedoraproject.org/pub/epel/epel-release-latest-7.noarch.rpm
# yum -y install https://rpms.remirepo.net/enterprise/remi-release-7.rpm

# yum -y install yum-utils
# yum-config-manager --enable remi-php72
# yum update
# yum install wget zip unzip
# yum install httpd
# yum install mariadb-server mariadb
# mysql_secure_installation
And answer to questions in wizard:
# yum install php php-common php-mcrypt php-cli php-gd php-curl php-mysql
php-xml php-mbstring php-sodium php-pecl-mysql
# yum install gcc php-devel php-pear # yum install ImageMagick ImageMagick-devel # pecl install imagick You should add "extension=imagick.so" to php.ini –ł–Ľ–ł —Ā–ĺ–∑–ī–į—ā—Ć —Ą–į–Ļ–Ľ–ł–ļ –≤ # vi /etc/php.d/imagick.so extension=imagick.so
https://tst-amo.net.ua/blog/?p=2937
# yum install proftpd
mount -o bind /var/www/html /home/aws/html
# httpd -M
# yum install mod_ssl openssh
# apachectl restart
# httpd -t
# systemctl status httpd
# cat httpd.conf | egrep "^[^#]"
ServerRoot "/etc/httpd"
ServerTokens ProductOnly
  ServerSignature Off
  Listen 0.0.0.0:80
  Include conf.modules.d/*.conf
  User apache
  Group apache
  ServerAdmin root@localhost
  ServerName aws.tst-amo.net.ua:80
<Directory />
  AllowOverride none
  Require all denied
</Directory>
  DocumentRoot "/var/www/"

# Relax access to content within /var/www
<Directory "/var/www">
  AllowOverride All
  #Allow open access:
  Require all granted
  #Require all denied
</Directory>

# Further relax access to the default document root
<Directory "/var/www/html">
  Options -Indexes +FollowSymLinks
  AllowOverride All
  Require all granted
</Directory>

<Directory "/var/www/cgi-bin">
  AllowOverride None
  Options None
  Require all granted
</Directory>

<IfModule mime_module>
  TypesConfig /etc/mime.types
  AddType application/x-compress .Z
  AddType application/x-gzip .gz .tgz
  AddType text/html .shtml
  AddOutputFilter INCLUDES .shtml
</IfModule>

<IfModule dir_module>
  DirectoryIndex index.php index.html index.htm index.shtml
</IfModule>

<Files ".ht*">
  Require all denied
</Files>

ErrorLog "logs/error_log"
LogLevel warn

<IfModule log_config_module>
  LogFormat "%h %l %u %t \"%r\" %>s %b \"%{Referer}i\" \"%{User-Agent}i\"" combined
  LogFormat "%h %l %u %t \"%r\" %>s %b" common

  <IfModule logio_module>
  # You need to enable mod_logio.c to use %I and %O
  LogFormat "%h %l %u %t \"%r\" %>s %b \"%{Referer}i\" \"%{User-Agent}i\" %I %O" combinedio
  </IfModule>

  CustomLog "logs/access_log" combined
</IfModule>

<IfModule alias_module>
  ScriptAlias /cgi-bin/ "/var/www/cgi-bin/"
</IfModule>
<IfModule mime_magic_module>
  MIMEMagicFile conf/magic
</IfModule>

EnableSendfile on
IncludeOptional conf.d/*.conf
–ó–į–Ņ—É—Ā–ļ–į–Ķ–ľ —Ā–į–Ļ—ā –Ĺ–į –Ņ—Ä–ĺ—ā–ĺ–ļ–ĺ–Ľ–Ķ http
# vi /etc/httpd/conf.d/aws.conf

<VirtualHost 0.0.0.0:80>
  ServerName aws.tst-amo.net.ua
  ServerAlias www.aws.tst-amo.net.ua
  ServerAdmin webmaster@localhost
  DocumentRoot /var/www/html
  ErrorLog /var/log/httpd/error.log
  CustomLog /var/log/httpd/access.log combined
  Redirect permanent / https://aws.tst-amo.net.ua/
</VirtualHost>
# wget https://files.phpmyadmin.net/phpMyAdmin/4.9.11/phpMyAdmin-4.9.11-all-languages.zip
–ü—Ä–į–≤–ł–ľ –ļ–ĺ–Ĺ—Ą–ł–≥:
# cp config.sample.inc.php config.inc.php
# vi config.inc.php
$cfg['blowfish_secret'] = '12345678901234273190123456789012'
/**
* Directories for saving/loading files from server
*/
$cfg['TempDir'] = '/tmp';
# yum install certbot
# certbot certonly -n --standalone -m user@gmail.com --agree-tos -d aws.tst-amo.net.ua
# ss -tlpn | grep -E ":(80|443)"
# systemctl stop httpd
# certbot certonly -n --standalone -m user@gmail.com --agree-tos -d aws.tst-amo.net.ua
# systemctl start httpd
–ü—Ä–ĺ–ī–Ľ–Ķ–Ĺ–ł–Ķ —Ā–Ķ—Ä—ā–ł—Ą–ł–ļ–į—ā–ĺ–≤:
# vi /etc/cron.daily/certbot-renew

#!/bin/sh
if certbot renew > /var/log/letsencrypt/renew.log 2>&1 ; then
  /usr/sbin/service httpd reload >> /var/log/letsencrypt/renew.log
fi

exit
# crontab -e
07 02,18 * * * /etc/cron.daily/certbot-renew
–ü–ĺ–ī–ļ–Ľ—é—á–ł–ľ SSL –≤ apache, —Ā–ĺ–∑–ī–į–Ķ–ľ –ļ–ĺ–Ĺ—Ą —Ą–į–Ļ–Ľ
# vi /etc/httpd/conf.d/aws-ssl.conf
<VirtualHost 0.0.0.0:443>
  ServerName aws.tst-amo.net.ua
  ServerAlias www.aws.tst-amo.net.ua
  ServerAdmin webmaster@localhost
  DocumentRoot /var/www/html
  ErrorLog /var/log/httpd/error.log
  CustomLog /var/log/httpd/access.log combined
  SSLEngine on
  SSLProtocol all -SSLv2 -SSLv3 -TLSv1 -TLSv1.1
  SSLCipherSuite "EECDH+ECDSA+AESGCM EECDH+aRSA+AESGCM EECDH+ECDSA+SHA384 EECDH+ECDSA+SHA256 EECDH+aRSA+SHA384 EECDH+aRSA+SHA256 EECDH+aRSA+RC4 EECDH EDH+aRSA RC4 !aNULL
  SSLHonorCipherOrder on
  SSLCompression off
  Header always set Strict-Transport-Security "max-age=15552000; includeSubDomains; preload"

  SSLCertificateFile /etc/letsencrypt/live/aws.tst-amo.net.ua/cert.pem
  SSLCertificateChainFile /etc/letsencrypt/live/aws.tst-amo.net.ua/chain.pem
  SSLCertificateKeyFile /etc/letsencrypt/live/aws.tst-amo.net.ua/privkey.pem
</VirtualHost>
–ü—Ä–ĺ–≤–Ķ—Ä—Ź–Ķ–ľ –Ĺ–į —Ā–į–Ļ—ā–Ķ ssllabs.com –ł —Ä–į–ī—É–Ķ–ľ—Ā—Ź —Ä–Ķ–Ļ—ā–ł–Ĺ–≥—É A+.
–Ē–ĺ—É—Ā—ā–į–Ĺ–ĺ–≤–ł–ľ –Ĺ–Ķ–ľ–ĺ–Ī—Ö–ĺ–ī–ł–ľ—č–Ļ –ľ–Ķ—Ö–į–Ĺ–ł–∑–ľ –ł –ļ–ĺ–Ĺ—Ā–ĺ–Ľ—Ć–Ĺ—č–Ļ –Ņ–ĺ—á—ā–ĺ–≤–ł–ļ –ī–Ľ—Ź –Ņ—Ä–ĺ–≤–Ķ—Ä–ļ–ł:
# yum install cyrus-sasl-plain
# yum install mailx
Postfix –Ī—É–ī–Ķ—ā –Ĺ–į—Ā—ā—Ä–ĺ–Ķ–Ĺ –ļ–į–ļ —Ä–Ķ–Ľ–Ķ–Ļ, –ł—Ā–Ņ–ĺ–Ľ—Ć–∑—É—Ź google —É—á–Ķ—ā–ļ—É:
# vi /etc/postfix/main.cf

relayhost = [smtp.gmail.com]:587

# Enables SASL authentication for postfix
smtp_sasl_auth_enable = yes
# Disallow methods that allow anonymous authentication smtp_sasl_security_options
= noanonymous
# Location of sasl_passwd we saved
smtp_sasl_password_maps = hash:/etc/postfix/sasl/sasl_passwd
# Enable STARTTLS encryption for SMTP
smtp_tls_security_level = encrypt
# Location of CA certificates for TLS
smtp_tls_CAfile = /etc/ssl/certs/ca-bundle.crt
smtp_sasl_security_options = noanonymous

# TLS parameters
smtpd_tls_cert_file=/etc/letsencrypt/live/aws.tst-amo.net.ua/fullchain.pem
smtpd_tls_key_file=/etc/letsencrypt/live/aws.tst-amo.net.ua/privkey.pem
smtp_use_tls=yes
#smtpd_tls_mandatory_protocols=!SSLv2, !SSLv3
smtpd_tls_session_cache_database = btree:${data_directory}/smtpd_scache
smtp_tls_session_cache_database = btree:${data_directory}/smtp_scache
# vi /etc/postfix/master.cf
submission inet n - n - - smtpd
# vi /etc/postfix/aliases
postmaster: postmaster@aws.tst-amo.net.ua
root: no_reply_dataverse@aws.tst-amo.net.ua
# postmap aliases
# vi /etc/aliases
# Basic system aliases -- these MUST be present.
mailer-daemon: postmaster
postmaster: root
root: user@gmail.com
# newaliases
# vi /etc/postfix/sasl/sasl_passwd
[smtp.gmail.com]:587 user@mail.com:your_password
# postmap /etc/postfix/sasl/sasl_passwd
# chown root:root /etc/postfix/sasl/sasl_passwd /etc/postfix/sasl/sasl_passwd.db
# chmod 600 /etc/postfix/sasl/sasl_passwd /etc/postfix/sasl/sasl_passwd.db
# yum install ca-certificates
# systemctl restart postfix
–ü—Ä–ĺ–≤–Ķ—Ä–ļ–į:
# echo "Test Postfix Gmail https://example.com" | mail -s "Postfix Gmail" to_user@domen.ua
–ó–į–Ī–Ľ–ĺ–ļ–ł—Ä–ĺ–≤–į—ā—Ć –ī–ĺ—Ā—ā—É–Ņ –ļ —É—Ā—ā—Ä–ĺ–Ļ—Ā—ā–≤—É –Ĺ–į 14 –ī–Ĺ–Ķ–Ļ
/ip firewall filter
add action=drop chain=input comment="Drop - port scanners" src-address-list=\
Port-Scanners
add action=drop chain=forward comment="Drop - port scanners" \
src-address-list=Port-Scanners
add action=add-src-to-address-list address-list=Port-Scanners \
address-list-timeout=2w chain=input comment="Scan - Scan Ports" protocol=\
tcp psd=21,3s,3,1
add action=add-src-to-address-list address-list=Port-Scanners \
address-list-timeout=2w chain=input comment=\
"Scan - NMAP FIN Stealth scan" protocol=tcp tcp-flags=\
fin,!syn,!rst,!psh,!ack,!urg
add action=add-src-to-address-list address-list=Port-Scanners \
address-list-timeout=2w chain=input comment="Scan - SYN/FIN scan" \
protocol=tcp tcp-flags=fin,syn
add action=add-src-to-address-list address-list=Port-Scanners \
address-list-timeout=2w chain=input comment="Scan - SYN/RST scan" \
protocol=tcp tcp-flags=syn,rst
add action=add-src-to-address-list address-list=Port-Scanners \
address-list-timeout=2w chain=input comment="Scan - FIN/PSH/URG scan" \
protocol=tcp tcp-flags=fin,psh,urg,!syn,!rst,!ack
add action=add-src-to-address-list address-list=Port-Scanners \
address-list-timeout=2w chain=input comment="Scan - ALL/ALL scan" \
protocol=tcp tcp-flags=fin,syn,rst,psh,ack,urg
add action=add-src-to-address-list address-list=Port-Scanners \
address-list-timeout=2w chain=input comment="Scan - NMAP NULL scan" \
protocol=tcp tcp-flags=!fin,!syn,!rst,!psh,!ack,!urg
–∑–Ĺ–į—á–Ķ–Ĺ–ł—Ź Timeout:
–ü–ĺ —Ä–Ķ–∑—É–Ľ—Ć—ā–į—ā–į–ľ —Ä–į–Ī–ĺ—ā—č —Ā–ļ–į–Ĺ–Ķ—Ä–į —Ā–ĺ–∑–ī–į—é—ā—Ā—Ź –∑–į–Ņ–ł—Ā–ł –≤ Address Lists, –ļ–ĺ—ā–ĺ—Ä—č–ľ –∑–į–Ņ—Ä–Ķ—Č–Ķ–Ĺ –ī–ĺ—Ā—ā—É–Ņ –≤ —Ü–Ķ–Ņ–ĺ—á–ļ–Ķ input –Ĺ–į 14 –ī–Ĺ–Ķ–Ļ.